Welcome to the datasci-gpu Cluster
Introduction
Welcome to datasci-gpu, a GPU cluster aiming to facilitate access to GPU compute for students in the Faculty of Mathematics at the University of Waterloo. This documentation serves as a comprehensive guide to understanding and utilizing datasci-gpu, a GPU cluster managed through the Slurm workload manager.
The datasci-gpu cluster is one part of a bigger datasci cluster, with datasci-gpu focused on providing GPU compute for students looking to experiment with using GPUs for learning/coursework purposes. The overall datasci cluster also includes a Hadoop cluster that is used specifically for the course CS 451. For more information about how to access the Hadoop side of the datasci cluster, please refer to your instructor's course materials.
Getting access to datasci-gpu
- Students: Send an email to dl-datasci-admin@uwaterloo.ca, letting us know the reason you're looking to access datasci-gpu. For example, if you're looking to use GPU resources for a specific course, let us know which course.
Before making an account request, please load an SSH key at https://authman.uwaterloo.ca
Contact
If you require assistance while using datasci-gpu, you can contact the following:
- Admin support: dl-datasci-admin@uwaterloo.ca
Before contacting admins, please refer to the FAQs page for answers to FAQs, as well as guidelines on how to best structure an issue report to the datasci-gpu admins.
Usage
The nodes can be accessed through Jupyterhub or SLURM.
Slurm: How it works
Slurm simplifies the user experience by allowing you to submit, monitor, and manage your computational jobs seamlessly. Through straightforward command-line interfaces, you can submit batch jobs, specify resource requirements, and monitor job progress.
Once your script is ready, launching a job is fairly simple:
- Login: Access datasci-gpu.cs using your credentials.
- Submit a Job: Utilize the
sbatchcommand to submit your script that you wish to run. Think of it as asking the server to perform specific computations for you using specific resources (how many GPUs, how much memory ...). - Monitor Progress: You can use
squeueto view the job queue and monitor job details. - Enjoy: Your job will be run by the server as soon as the requested resources are available.
For more in-depth information, visit this page.
Happy Computing!
SLURM
salloc --gres=gpu:1 or salloc --gres=gpu:4
SLURM
Do not run process on <username>@datasci-gpu
The login node is not a compute machine, any process not runing on a compute node (<username>@gpu-[1-8]-vm) that use heavy resources will be terminated without warning. Please read this page to know how to properly access a compute node.
SLURM (formerly, Simple Linux Utility for Resource Management) is an application for managing tasks on computer systems.
The official SLURM cheatsheet can be found HERE
SLURM has two main operating modes: batch and interactive. Batch is the preferred mode for datasci-gpu.cs: you can start your task and get an email notification when it is completed. See the batch section for more details. If you require an interactive session (useful for debugging) with datasci-gpu.cs hardware, see the salloc section.
Before you submit jobs, you should learn about how to monitor running jobs and view cluster resources.
Monitoring jobs and cluster resources
Current jobs
To look at the queue of jobs currently, you can use squeue to display it. The command scurrent will also give all the current jobs running on datasci-gpu.
By default squeue will show all the jobs the scheduler is managing at the moment. It will run much faster if you ask only about your own jobs with
$ squeue -u $USER
You can show only running jobs, or only pending jobs:
$ squeue -u <username> -t RUNNING
$ squeue -u <username> -t PENDING
You can show detailed information for a specific job with scontrol:
$ scontrol show job -dd <jobid>
Do not run squeue from a script or program at high frequency, e.g., every few seconds. Responding to squeue adds load to Slurm, and may interfere with its performance or correct operation.
Cancelling jobs
Use scancel with the job ID to cancel a job:
$ scancel <jobid>
You can also use it to cancel all your jobs, or all your pending jobs:
$ scancel -u $USER
$ scancel -t PENDING -u $USER
Monitoring cluster resources
To view all cluster resources, you can use sresources to monitor the availability of cluster resources. It will give you basic information on the:
- total number of GPUs available on each compute node
- the number of GPUs currently allocated on each compute node
- amount of available and allocated RAM on each compute node
- number of CPU cores available and allocated on each compute node
Batch mode usage
The batch allows you to give an entire script for datasci-gpu to run using a certain amount of resources. Your script will be running in the background, so you can log out without losing your progress. The resources used by your job will automatically be reliquished once the job is done.
You can submit jobs using an SLURM job script. Below is an example of a simple script:
warning: #SBATCH is the trigger word for slurm to take into account your arguments. If you wish to disable a line consider using ##SBATCH, do not remove # at the beginning of the lines.
#!/bin/bash

# To be submitted to the SLURM queue with the command:
# sbatch batch-submit.sh

# Set resource requirements: Queues are limited to seven day allocations
# Time format: HH:MM:SS
#SBATCH --time=00:15:00
#SBATCH --mem=10GB
#SBATCH --cpus-per-task=2
#SBATCH --gres=gpu:1

# Set output file destinations (optional)
# By default, output will appear in a file in the submission directory:
# slurm-$job_number.out
# This can be changed:
#SBATCH -o JOB%j.out # File to which STDOUT will be written
#SBATCH -e JOB%j-err.out # File to which STDERR will be written

# email notifications: Get email when your job starts, stops, fails, completes...
# Set email address
#SBATCH --mail-user=(email address where notifications are delivered to)
# Set types of notifications (from the options: BEGIN, END, FAIL, REQUEUE, ALL):
#SBATCH --mail-type=ALL

# Load up your conda environment
# Set up environment on datasci-gpu.cs or in interactive session (use `source` keyword instead of `conda`)
source activate <env>

# Task to run

~/cuda-samples/Samples/5_Domain_Specific/nbody/nbody -benchmark -device=0 -numbodies=16777216
You can use SBATCH variables like --mem, for example the one above will assign 10GB of RAM to the job.
For CPU cores allocation, you can use --cpus-per-task , for example the one above will assign 4 cores to the job.
The --gres=gpu:1 will assign 0.25x GPU to your job.
The --gres=gpu:4 will assign a full GPU to your job.
Running the script
To run the script, simply run sbatch your_script.sh on datasci-gpu.cs
Interactive mode usage
The interactive mode log you into a terminal session where you have access to the asked resources. This is useful for debugging or testing code.
You can book/reserve resources on the cluster using the salloc command. Below is an example:
salloc --gres=gpu:2 --cpus-per-task=4 --mem=16G --time=2:00:00
The example above will reserve 2 GPUs, 4 CPU cores, and 16GB of RAM for 2 hours. Once you run the command, it will output the name of the host like so:
salloc: Nodes gpu-1-vm are ready for job
here gpu-1-vm is the assigned host that the user can SSH to.
Ideally you want to run this command in either a screen or tmux session on datasci-gpu.cs
Note: There is a limit of 7 hours on job running in interactive mode. To access resources for longer, consider using the batch for up to 7 days
The cluster consists of 7 nodes. Each node is equipped with a NVIDIA RTX PRO 6000 Blackwell Max-Q Workstation Edition.
Each RTX PRO 6000 is put into MIG mode, which splits it into 4 GPUs instances, where each instance has 1 quarter of the compute and VRAM.
Nodes gpu-[1,3,4,5]-vm have a single socket Intel(R) Xeon(R) Gold 5412U.
Nodes gpu-[6,8]-vm have a single socket AMD EPYC 9354P 32-Core Processor.
Each VM is configured with 192GiB of memory.
Managing virtual environments on the cluster
Virtual environments are self-contained directories that contain all libraries and dependencies for a specific project, allowing you to work on multiple projects without conflicts between their requirements. They help you isolate project dependencies, manage versions, and ensure that different software stacks don't interfere with each other. This can be especially useful when working on datasci-gpu since there might be specific versions of libraries that may be required for your specific research projects.
The default environment manager for all users on the cluster is conda, though pip virtual environments are also supported.
Creating and activating conda environments is simple on datasci-gpu:
(base) $ conda create -n <conda-venv-name>
(base) $ conda activate <conda-venv-name>
<conda-venv-name> $
You can create pip virtual environments while a conda environment is activated, and after creating the pip virtual environment, you can deactivate the conda environment and activate the pip virtual environment normally.
(base) $ python -m venv <venv-name>
(base) $ conda deactivate
$ source <venv-name>/bin/activate
Installing useful tools through conda
Tools like nvcc and nvtop can be installed using conda since conda is also a package manager.
To perform a basic install of all CUDA Toolkit components using conda, run:
conda install cuda -c nvidia
You can install previous CUDA releases by following the instructions detailed in the Conda Installation section of NVIDIA's online documentation.
To install nvtop, which can be used to better monitor GPU utilization and GPU memory usage, run:
conda install --channel conda-forge nvtop
Further information about nvtop can be found here.
If a tool suggests you to use apt or apt-get to install it, please check if you can install the same tool through conda. If this isn't possible, you can send an email to dl-datasci-admin@uwaterloo.ca and we can look into installing the tool for you.
JupyterHub on datasci-gpu
JupyterHub allows you to easily run Jupyter notebooks on the cluster, providing you with another way to run interactive jobs to debug and test your code on the cluster. There is also the added benefit of being able to monitor your code's GPU utilization through the jupyterlab-nvdashboard extension that is enabled for all users, allowing you to understand if your code is efficiently using its allocated GPU.
Users who are looking to use Jupyter notebooks on datasci-gpu can securely sign in to datasci-gpu's JupyterHub at datasci-gpu.cs.uwaterloo.ca/jupyterhub/ using their UWaterloo credentials and authenticate using Duo two-factor authentication.
After signing in, users can request resources by filling out a form that specifies, the compute node, number of CPU cores, memory (in GB), number of GPUs, and time.
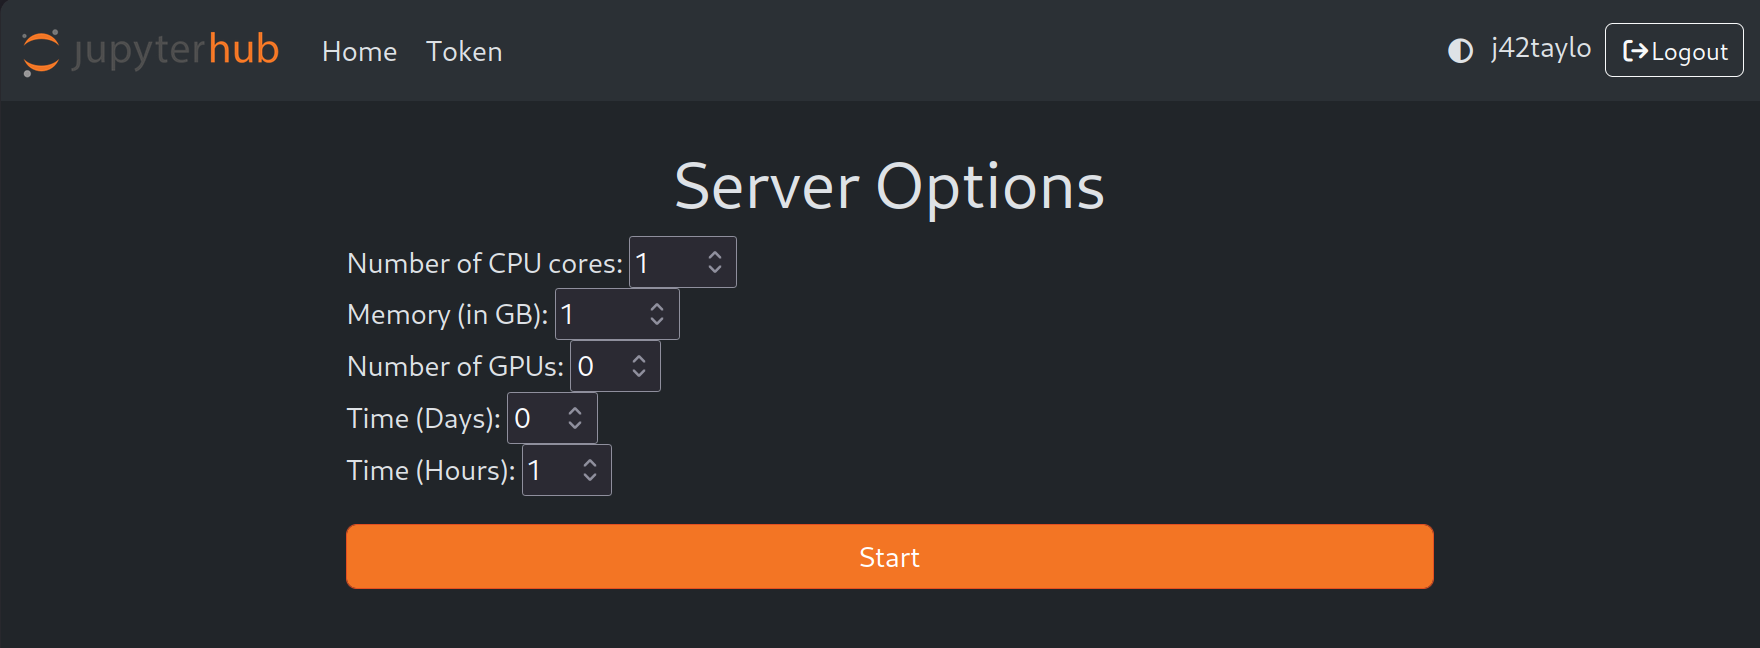
Jupyter notebooks through JupyterHub are meant for debugging and testing your code, not for full production runs - we recommend submitting an sbatch job for full runs.
Virtual environments vs Jupyter kernels for Jupyter notebooks
Virtual environments, as explained in our section about virtual environments, are used as isolated directories that hold any associated libraries and packages required for a project. Jupyter kernels are used by Jupyter to run Jupyter notebooks in different virtual environments. You can use different virtual environments as different Jupyter kernels, so each Jupyter notebook can run with the libraries and packages specific to that environment.
When you create a Python virtual environment, it typically comes with its own Python interpreter that can be used to install different Python packages within the environment. To use that environment as a Jupyter kernel, you need to make it available to Jupyter by installing the ipykernel package and linking the environment to Jupyter, allowing you to select that environment as the kernel when you launch a Jupyter notebook.
Installing ipykernel and linking conda venvs to Jupyter
Activate the conda virtual environment you want to add as a kernel, then install ipykernel using conda:
(base) $ conda activate <conda-venv>
<conda-venv> $ conda install -c anaconda ipykernel
then add the conda virtual environment as a kernel:
<conda-venv> $ python -m ipykernel install --user --name=<conda-venv>
Installing ipykernel and linking pip venvs to Jupyter
Activate the pip virtual environment you want to add as a kernel, the install ipykernel using pip:
$ source <venv-name>/bin/activate
<venv-name> $ pip install ipykernel
then add the pip virtual environment as a kernel:
<venv-name> $ python -m ipykernel install --user --name=<venv-name>
You can then launch a Jupyter notebook from the directory that contains the pip virtual environment directory.
Jupyter kernels
e
VSCode Tutorial: Working with datasci-gpu
In this tutorial, we'll walk you through the process of setting up and using Visual Studio Code (VSCode) to work with datasci-gpu. This guide will cover connecting to the login gateway and accessing specific clusters (e.g., gpu-1-vm, gpu-2-vm, ...) after allocating resources.
Note that this method of connecting to datasci-gpu should be used for debugging and understanding your code via testing and notebooks. If you wish to run long experiments, please use the SBATCH command.
Prerequisites
Before you begin, make sure you have the following prerequisites installed:
Quick steps to install the Remote - SSH extension:
- Open Visual Studio Code
- Click on the Extensions icon in the Activity Bar on the side of the window.
- Search for "Remote - SSH" in the Extensions view search box.
- Install the "Remote - SSH" extension.
Step 1: Configuring VSCode
Once the extension is installed, follow these steps to connect to the login gateway (replace your_username with your actual username):
-
Press
Ctrl + Shift + P(Windows/Linux) orCmd + Shift + P(Mac) to open the command palette. -
Type "Remote-SSH: Open SSH Configuration File ...", select it and select the desired file (recommended file:
~/.ssh/config). -
Insert the following part and replace
<username>and<path/to/private/key>with your username and the path to your private key registered in WatGPU:# datasci-gpu Host DoNotConnect_datasciGPU User <username> IdentityFile <path/to/private/key> HostName datasci-gpu.cs.uwaterloo.ca Host gpu-1-vm User <username> IdentityFile <path/to/private/key> HostName gpu-1-vm ProxyJump DoNotConnect_datasciGPU Host gpu-2-vm User <username> IdentityFile <path/to/private/key> HostName gpu-2-vm ProxyJump DoNotConnect_datasciGPU Host gpu-3-vm User <username> IdentityFile <path/to/private/key> HostName gpu-3-vm ProxyJump DoNotConnect_datasciGPU -
Save and refresh the Remote - SSH extension menu.
Step 2: Allocate Resources and Connect to Cluster
After successfully connecting via ssh to datasci-gpu.cs.uwaterloo.ca, you'll need to allocate resources using salloc and then connect to a specific cluster:
-
Follow the Interactive mode part of the documentation to obtain resource allocation.
-
Once resources are allocated, connect to the appropriate cluster in VSCode:
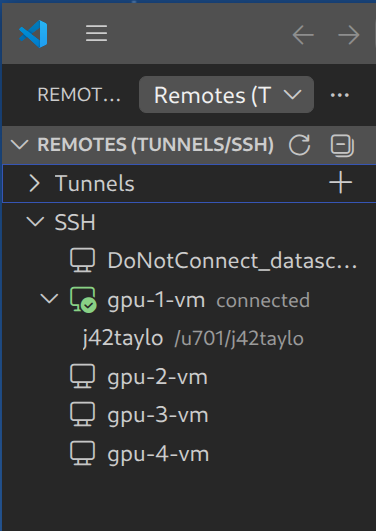
That's it! You are now set up to work with datasci-gpu using Visual Studio Code.